Adding a Newsletter (Using Nov 2016 as example)
- Before starting make a thumbnail image of the newsletter. The dimensions are 150px wide by 213px high. I use Gimp, but Photoshop or any photo editing software will do it. When it is done you need to load it into the media library and call it (relevant month, nov_newsletter_2016_thumbnail.jpg
- Open the Newsletters page.
- First thing can you clone that says “Newsletter April 2016” by clicking on the image which looks like one rectangle above another just to the left of the module heading.
- Next drag the cloned module and put it in the row under the “Newsletter Archives Heading Text” row into one of the boxes that say Insert Module(s). I think it will look best on the left hand side of this empty row, but you can play with it.
- Now go to the original module which will still be under the “Our Current Newsletter heading”. Open this module by clicking on the “hamburger” to the left of the clone tool and change the heading to November 2016. Then scroll down to the bottom of the settings and change the Admin Label to Newsletter november 2016.
- Then click save and exit. Then click on Update (the green button on the right hand side of the screen)
- Then can you load the new newsletter into the Media library as a PDF. Call it nov_2016_newsletter_website.pdf.
- Copy the URL link which is at the top right hand side of the item details.
- Go back to the newsletter page and open up the November 2016 module (which you just changed the name of). Double click in the Url field and insert the new newsletter url (which you have just copied).
- Scroll down the module settings to the Image setting. Click on UPLOAD AN IMAGE button and select the jpg thumbnail that you created.
- Click save and exit.
- Click on update.
Then check and test and it should all work. 🙂
Playford Trust Greens
NEW PLAYFORD TRUST GREEN
#7C9840
C55/M23/Y100/K5
And the olive is a little bit lighter than the one in your demo page:
PLAYFORD TRUST OLIVE
#615D37
C53/M48/Y88/K31
In the logo I¹ve made ³Playford² DIN bold and ³Trust² is still DIN Regular
Edit the Photo Gallery
Step 1: Open the page which hosts the gallery you want to edit.
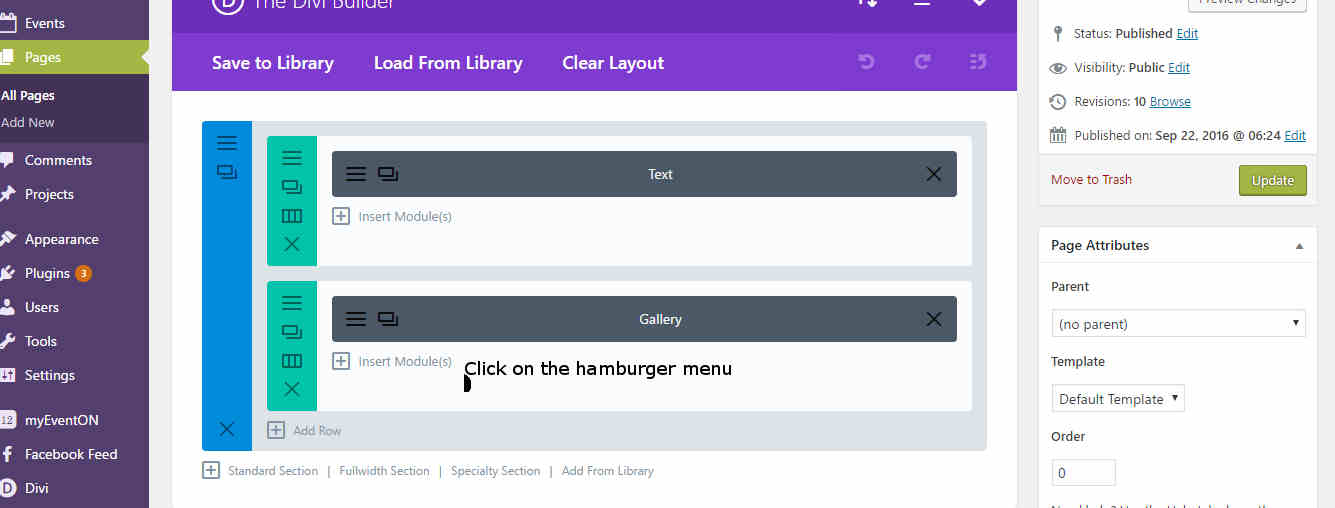
For example the Photo Gallery Page. You will see the Divi Builder and below the builder two modules. Text and Gallery. Click on the Hamburger menu (three grey lines on the left hand side of the grey banner which is titled Gallery) to open the module options.
Step 2: Select the UPDATE GALLERY button which is the first button under General Settings.
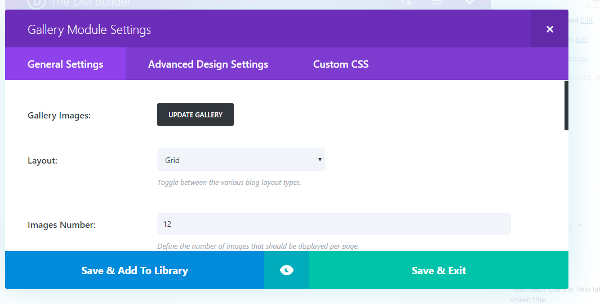
Step 3: Select theGallery Settings you require. Here you can:
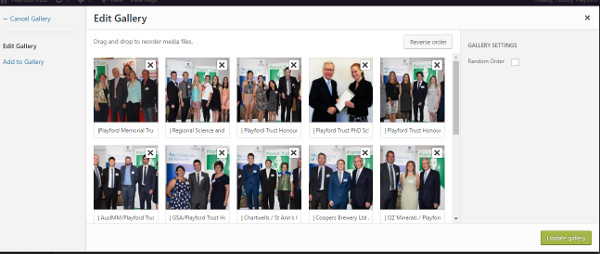
- Edit the Gallery – Drag and drop images to the order you would like them.
- Add to Gallery using the media libarary process
- Select the Gallery Settings – such as reverse order or random order. Current settings should have none of these ticked as you want to be able to order the files yourself.
REMEMBER
- Remember to click on the Green “Update Gallery” button at the bottom right of the screen.
- Then click on “Save and Exit” to exit the module settings and then;
- Click the Green “Update” button on the right hand side as normal to save the page changes.
Code for Editing Footer.
To edit footer. Add this to child theme footer.php
<?php
if ( false !== et_get_option( ‘show_footer_social_icons’, true ) ) {
get_template_part( ‘includes/social_icons’, ‘footer’ );
}
?>
<h5><div style=”float:left; display: inline; positive:relative;”><a href=”http://https://www.sa.gov.au/” target=”_blank”><img src=”http://223.27.23.70/~devplayfordtrust/wordpress/wp-content/uploads/2016/08/Picture-Device-Independent-Bitmap-1.jpg” </div></h5>
<h5><div style=”float:right; display: inline; positive:relative;”> <a href=”http://wwdad.com” target=”_blank”>Designed by Wallace Web Design 2016</a></div></h5>
</div> <!– .container –>
Previous attempts were:
<?php
function et_get_safe_localization( $string ) {
if ( false !== strpos( $string, ‘Designed by ‘ ) && false !== strpos( $string, ‘Powered by ‘ ) ) {
return ‘Copyright ©2016 <a href=”www.3acm.org/privacy-policy
“>YOUR COMPANY NAME</a>’;
}
return wp_kses( $string, et_get_allowed_localization_html_elements() );
}
Richard’s code.
<h5><a href=”http://https://www.sa.gov.au/” target=”_blank”><img src=”http://223.27.23.70/~devplayfordtrust/wordpress/wp-content/uploads/2016/08/Picture-Device-Independent-Bitmap-1.jpg” >                         <a href=”http://wwdad.com” target=”_blank”>Designed by Wallace Web Design</a></h5>
Found as in here:
<?php if ( ‘on’ == et_get_option( ‘divi_back_to_top’, ‘false’ ) ) : ?>
<span class=”et_pb_scroll_top et-pb-icon”></span>
<?php endif;
if ( ! is_page_template( ‘page-template-blank.php’ ) ) : ?>
<footer id=”main-footer”>
<?php get_sidebar( ‘footer’ ); ?>
<?php
if ( has_nav_menu( ‘footer-menu’ ) ) : ?>
<div id=”et-footer-nav”>
<div class=”container”>
<?php
wp_nav_menu( array(
‘theme_location’ => ‘footer-menu’,
‘depth’ => ‘1’,
‘menu_class’ => ‘bottom-nav’,
‘container’ => ”,
‘fallback_cb’ => ”,
) );
?>
</div>
</div> <!– #et-footer-nav –>
<?php endif; ?>
<div id=”footer-bottom”>
<div class=”container clearfix”>
<?php
if ( false !== et_get_option( ‘show_footer_social_icons’, true ) ) {
get_template_part( ‘includes/social_icons’, ‘footer’ );
}
?>
<h5><a href=”http://https://www.sa.gov.au/” target=”_blank”><img src=”http://223.27.23.70/~devplayfordtrust/wordpress/wp-content/uploads/2016/08/Picture-Device-Independent-Bitmap-1.jpg” >                         <a href=”http://wwdad.com” target=”_blank”>Designed by Wallace Web Design</a></h5>
</div> <!– .container –>
</div>
</footer> <!– #main-footer –>
</div> <!– #et-main-area –>
<?php endif; // ! is_page_template( ‘page-template-blank.php’ ) ?>
</div> <!– #page-container –>
<?php wp_footer(); ?>
</body>
</html>